


How To Fix Common Honda Oil Leaks
No one wants to find that their car is leaking oil. It can provide a hazard on the road or the driveway and is a surefire indication that something is seriously wrong with your vehicle.
A professional mechanic will be able to identify the oil leak and its causes. Still, it’s always good to have an understanding of a problem yourself so you can drive your car safely to a mechanic to get it repaired. A leak should be fixed as soon as possible to prevent your vehicle from breaking down or developing other faults.
This guide will outline the causes of the most common Honda oil leaks, how to spot them, and how to fix a leak yourself before sending it to the mechanics.
How to spot an oil leak from your Honda
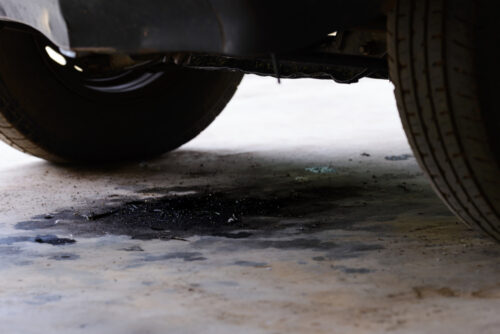
Spotting an oil leak from your Honda vehicle isn’t too difficult to notice. You may notice leaking oil from under the car or oil on the engine leaking from the valve covers. In the absolute worst case, if you have smoke under the bonnet, this could indicate that oil has leaked onto the exhaust manifold.
You should regularly check the dipstick to see if the oil levels are dropping – if they are, then you could be losing oil somewhere.
Most common oil leak causes
Several common causes for oil to leak from your Honda include oil filters, oil drain plugs, the valve cover gasket, and oil pans. Below you will find a round-up of the most common causes to help you identify your problem area and work out where the burning smell and leak is coming from.
Oil filter
A leak could come from the oil filter if the seal wasn’t appropriately fitted or has been damaged during the last oil change.
Oil drain plug
A loose oil drain plug would leave space for the oil to escape and cover your driveway if it has not been reattached correctly.
Valve cover gasket
You will find the valve cover gasket on the top of your engine, which protects components inside the cylinder head. Valve cover gaskets provide a seal between the cylinder head and valve cover. Over time, this seal will wear down and not be as effective at keeping the oil in, sometimes leading to leaks. If the valve covers leak, you can get oil on spark plugs, leading to problems with the ignition system.
Oil pan gasket
The oil pan gasket is probably the most common place you will find leaking oil as this part provides a seal between the oil pan and engine block. It can crack or get a hole, leading to an oil leak. You should get a new oil pan gasket as soon as this happens.
Cylinder head gasket
Cylinder head gaskets are more commonly known for causing internal oil leaks, but they can leak externally too. If there is a leak in this area, you will find coolant consumption and coolant-oil intermix issues.
Crankshaft seals
The crankshaft is an integral engine component that protrudes slightly from both engines ends. There are seals at both ends of the crankshaft to prevent oil from leaking from the engine. The seals are referred to as the front and rear main seals.
If the leak in the crankshaft seal is small, you will find oil accumulating on the underside of the engine, whereas if it is a significant leak, oil can be visible in the front of the engine.
Timing cover gasket
Some older car models may use a timing belt, but most modern vehicles have a timing chain protected by a timing cover gasket. As with many other Honda car parts mentioned, the timing cover gaskets will wear down over time. As the gasket wears down, the oil may start to escape from inside the timing cover. Sometimes, the timing cover itself is the source of the leak, not the gasket.
Camshaft seals
Camshaft seal leaks are common on engines that use a timing belt to keep the camshaft and crankshaft in sync. A camshaft seal fits around the end of each camshaft and is meant to prevent oil from leaking out of the engine.
If the camshaft is the cause of the leak, you will see oil on the engine below the valve cover. You will know a leak is coming from this component if a burning smell and smoke are pouring from the engine bay.
Are oil leaks worth fixing?
Yes, you should fix any leaks as soon as you find them. If you don’t, you will be looking at potentially thousands of pounds worth of damage to replace a broken engine at worst, replacing a few parts and topping up your oil at best.
It’s essential to replace the components with new parts when you notice a leak. If you go too long without topping up the oil you have lost, you will damage the components trying to work together as a well-oiled team.
How to fix an oil leak
Now that you can recognise the causes of an oil leak in your Honda Accord or other Honda models, it’s time to find out how to fix an oil leak yourself. Follow our simple step by step instructions below to stop your vehicle from leaking oil.
1 – Check your oil levels
To begin, you need to check the actual oil levels in your car. To do this, you should use the dipstick found under the car’s hood in the engine. Take it out, wipe away any excess oil, then firmly put it back in the engine to get a read of the oil level when you pull it out again. You should find an indicator on the dipstick to say where the appropriate oil level is, and you should fill up your oil only to this level.
Sometimes, what you think is a leak might actually be too much oil in the system as if it was overfilled in the last oil top-up. You will know this has happened if you notice oil puddles under your car, but the dashboard engine oil light is not flashing.
2 – Identify the leak
If your oil levels seem too low or depleted over time, you should look in all of the most likely places oil may be leaking from the car. Consult our list of common causes of oil leaks above for the typical places.
3 – Check for any loose bolts
It can also be good to check for any obvious loose bolts around the oil pan, timing belt cover, and valve covers. Grab a torque wrench and go around tightening the bolts on the car parts, starting with the oil pan. When you are satisfied with the tightness of the oil pan, move on to the timing belt cover and then the valve covers. Each car model requires you to tighten the bolts in a specific pattern and to a certain tolerance, so it may be worth consulting with a mechanic to ensure you are tightening the bolts correctly.
4 – Make any repairs
Once you have identified the area in which the leak is coming from, it’s time to make the repairs. If it is a case that the leak is coming from loose bolts, follow step 3 to repair them. Some other repairs are reasonably straightforward to do and can be done at home – like replacing an oil filter or the oil filler cap.
However, broken gaskets may need the help of a mechanic, as installing a new gasket can be difficult to do on your own if you are not experienced with machinery.
Find the correct oil and parts for your Honda
At Cox Motor Parts, we pride ourselves on providing high-quality genuine Honda parts straight from the manufacturer. No matter the type of Honda you own, we will likely have the part you need to finish fixing your car.
If you’re looking for more information about various other oils and parts, we have a variety of informational guides to help you make the right choice.
Read our other guides for more tips on maintaining your Honda: